How to Install the OpenAI Conversion Pixel on Shopify
A step-by-step playbook for tracking ChatGPT-driven sales, including the one gotcha that breaks 90% of installs.
ChatGPT is sending real traffic to DTC sites right now. The problem? Your attribution stack has no idea.
OpenAI's conversion pixel changes that. It tells you which sales come from ChatGPT-driven sessions, so you can stop guessing about your AI traffic and actually start optimizing for it. As of this year, it's becoming a real referral channel — and most brands haven't even noticed.
Here's the catch: the install snippet OpenAI gives you does not work on Shopify out of the box. If you paste it as-is into your theme.liquid file or into Shopify's Custom Pixel, it either does nothing — or it fires conversions on every page view and inflates your data into uselessness.
We've installed this for clients. Here's the exact process that works, in plain English. About 15 minutes start to finish.
What you'll need before you start
- Admin access to your Shopify store
- Your OpenAI Pixel ID (from your OpenAI conversion tracking dashboard)
- A browser with DevTools (Chrome, Safari, Firefox — any of them)
The two parts of the pixel (this is where most people mess up)
OpenAI's pixel has two jobs, handled by two different parts of the code:
- Init — Loads the pixel onto your site and identifies your account. Think of it as plugging in a security camera. It runs on every page, but doesn't log anything by itself.
- Measure — The actual conversion fires. Think of it as pressing record. These only run when a specific action happens — a PDP view, an add to cart, a checkout, a purchase.
The mistake I see brands make: they paste the whole snippet (including measure calls) into theme.liquid, which makes every page view register as a conversion. Your data turns into garbage and your ROAS reporting becomes meaningless.
The right setup uses Shopify's Custom Pixel feature. Custom Pixels run across your storefront and checkout, so you only need to install in one place. No theme.liquid edits. No legacy Additional Scripts hacks. And it's where Shopify is pushing everyone to install third-party tracking going forward.
Part 1: Prep work inside OpenAI
Before you touch Shopify, set up the receiving end inside OpenAI. This is the #1 reason merchants install the pixel and then see zero conversions — they skip this step.
Step 1: Create your data source
Inside your OpenAI conversion tracking dashboard, find the Data sources section and add a new source for your store:
- Name: Your brand name
- URL / Domain: Your store's primary domain (e.g. www.yourstore.com)
- Type: Website
OpenAI will issue you a Pixel ID tied to this data source. Copy it somewhere safe — you'll paste it into your Shopify code later. It looks like a random string of letters and numbers: XvyMWK2xW3nXNq5KMwh8yN
Heads up: If you run multiple Shopify stores (US, EU, wholesale), each one needs its own data source and its own Pixel ID. Don't share a pixel across stores — your data will mix and attribution will break.
Step 2: Create your four conversion events
Still inside OpenAI, create four conversion events tied to four specific Base Event names. These names must match the code in Part 2 exactly, character for character.
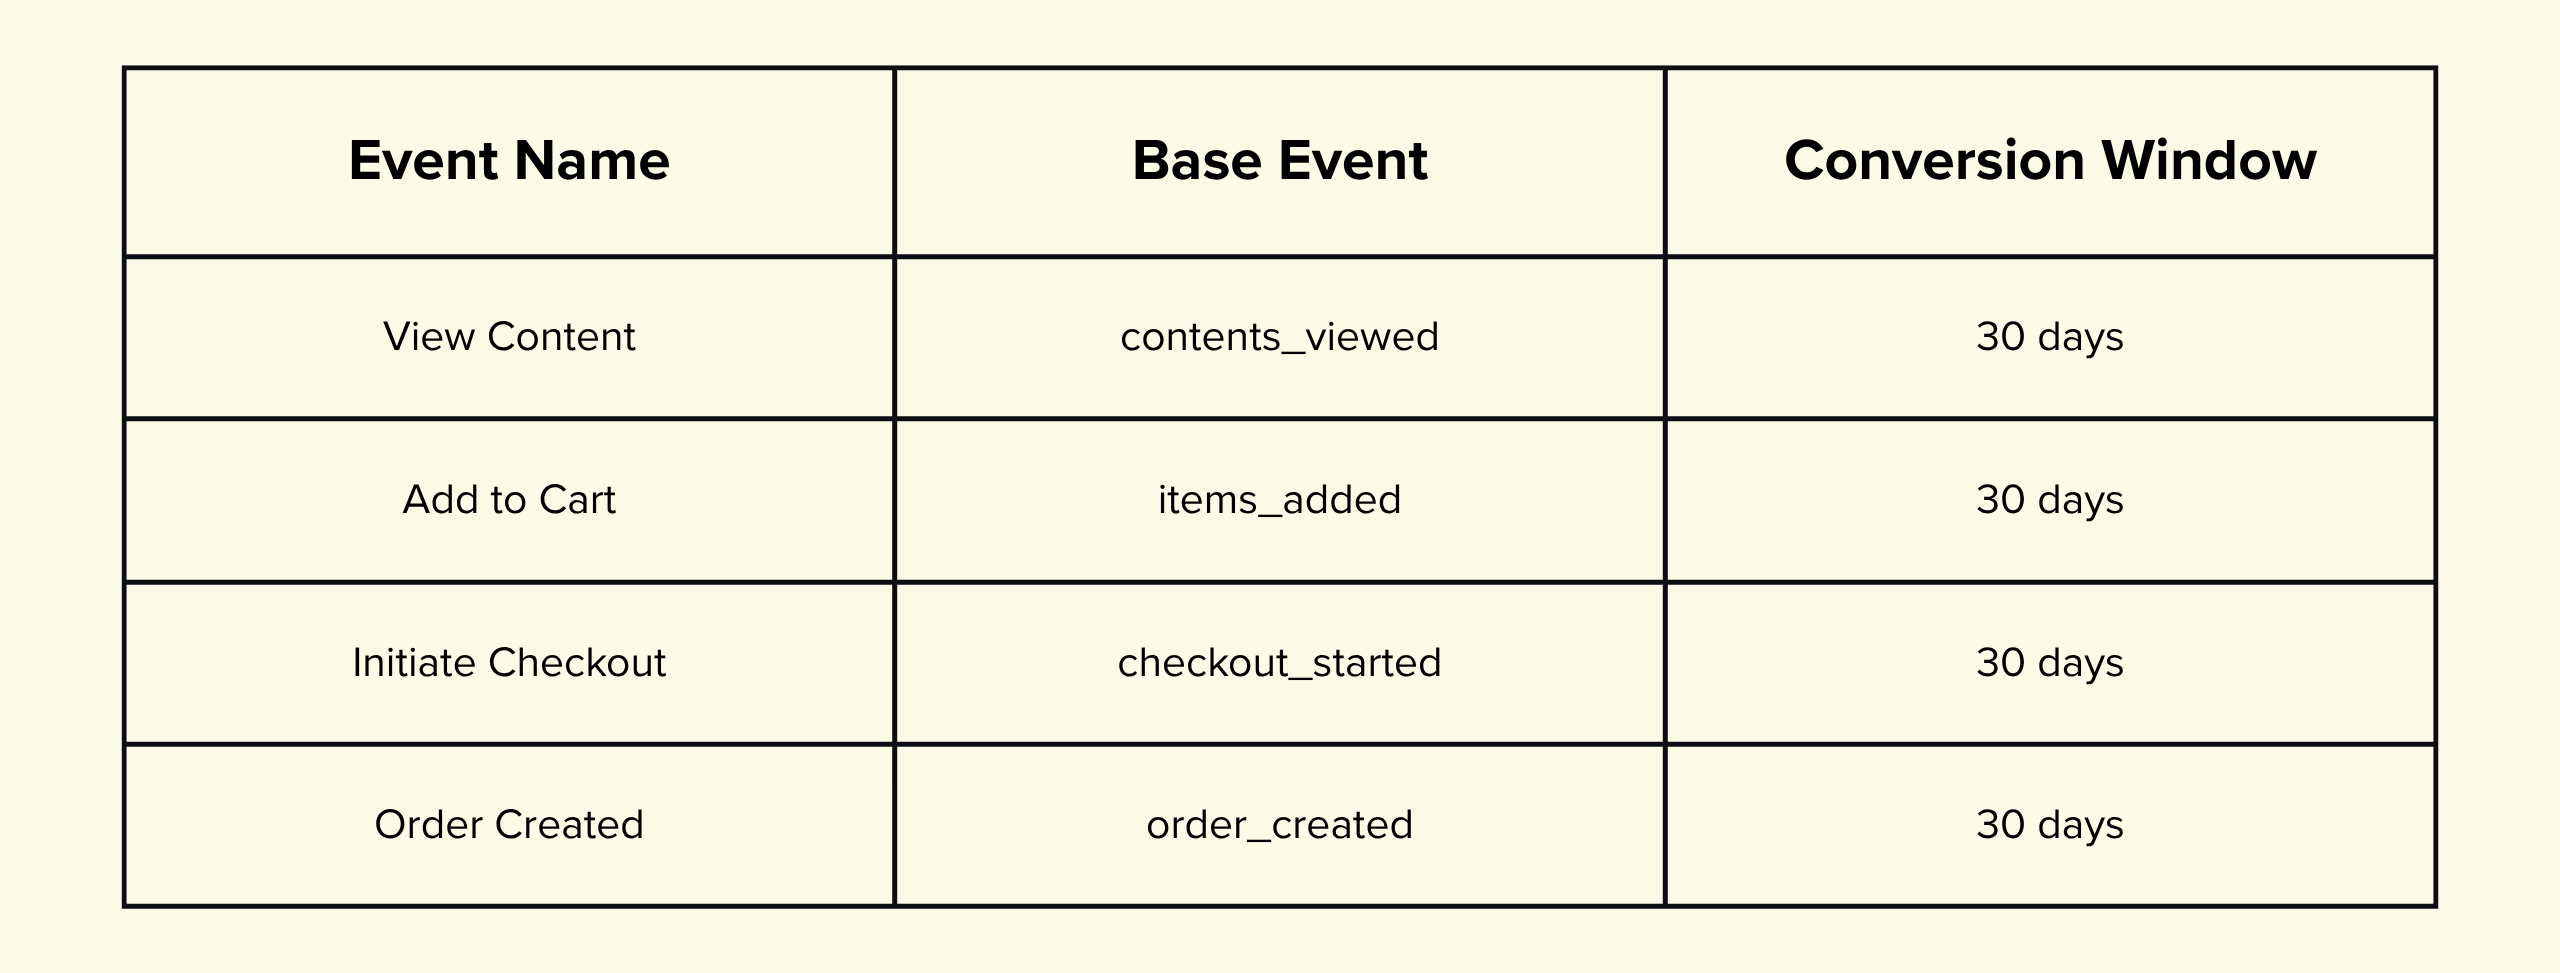
30 days is a sensible default for the conversion window. If your sales cycle is longer (high-consideration purchases, B2C lead gen), extend it. If it's shorter (impulse buys), tighten it.
This trips people up all the time: if you name the OpenAI base event purchase but the Shopify code fires order_created, OpenAI silently throws the event away. Use the exact snake_case names in the table above. No spaces. No capital letters.
Part 2: Install the pixel in Shopify
OpenAI is now ready to receive data. Head into your Shopify admin.
Step 3: Open Shopify's Customer Events
- Click Settings in the bottom-left of Shopify admin
- Click Customer events in the sidebar
- Click the Add custom pixel button
- Name it OpenAI Pixel and click Add pixel
You'll land on a configuration screen. Before pasting any code, set these:
- Customer privacy > Permission: Not required
- Customer privacy > Data sale: Data collected does not qualify as data sale
These settings tell Shopify the pixel is first-party conversion tracking on your own store — not a third-party data broker. (If you sell in the EU/UK and use consent banners, you may want Permission set to Required and paired with a consent management platform. Check with your privacy counsel if you're unsure.)
Step 4: Paste the tracking code — with one critical edit
This is the part that breaks most installs.
OpenAI's default install snippet wraps the code in HTML <script> and </script> tags, because it assumes you're pasting into the <head> of an HTML page. Shopify's Custom Pixel does not accept <script> tags. It expects raw JavaScript only. Paste with the tags included, and the pixel silently fails to run. You'll spend a week wondering why nothing's tracking.
So before pasting, strip these two lines out:
<script> ← REMOVE this opening tag
... (this is your actual JavaScript — keep it)
</script> ← REMOVE this closing tag
What's left is the raw JavaScript. Below is the full, Shopify-ready code with all four conversion events wired up. Copy this entire block, paste it into the Custom Pixel's Code field, and replace YOUR_PIXEL_ID_HERE with the Pixel ID from Step 1.
// --- OpenAI Pixel init ---
!function(w, d, s, u) {
if (w.oaiq) return;
var q = function() { q.q.push(arguments); };
q.q = [];
w.oaiq = q;
var j = d.createElement(s);
j.async = 1;
j.src = u;
var f = d.getElementsByTagName(s)[0];
f.parentNode.insertBefore(j, f);
}(window, document, "script", "https://bzrcdn.openai.com/sdk/oaiq.min.js");
oaiq("init", { pixelId: "INSERT YOUR PIXEL ID", debug: true });
// --- View Content (PDP views) ---
analytics.subscribe("product_viewed", (event) => {
const variant = event.data.productVariant;
oaiq("measure", "contents_viewed", {
type: "contents",
amount: Math.round(Number(variant?.price?.amount || 0) * 100),
currency: variant?.price?.currencyCode || "USD"
});
});
// --- Add to Cart ---
analytics.subscribe("product_added_to_cart", (event) => {
const line = event.data.cartLine;
const lineValue = Number(line?.merchandise?.price?.amount || 0) * (line?.quantity || 1);
oaiq("measure", "items_added", {
type: "contents",
amount: Math.round(lineValue * 100),
currency: line?.merchandise?.price?.currencyCode || "USD"
});
});
// --- Initiate Checkout ---
analytics.subscribe("checkout_started", (event) => {
const checkout = event.data.checkout;
oaiq("measure", "checkout_started", {
type: "contents",
amount: Math.round(Number(checkout?.totalPrice?.amount || 0) * 100),
currency: checkout?.totalPrice?.currencyCode || "USD"
});
});
// --- Order Created (purchase) ---
analytics.subscribe("checkout_completed", (event) => {
const checkout = event.data.checkout;
oaiq("measure", "order_created", {
type: "contents",
amount: Math.round(Number(checkout.totalPrice.amount) * 100),
currency: checkout.totalPrice.currencyCode
}, {
event_id: checkout.order?.id || checkout.token // dedup, in eventOptions not eventProps
});
});
How the dynamic values map to Shopify data
Every event pulls real values straight out of Shopify's customer event payload. Nothing is hardcoded — the numbers update with each customer's actual behavior.
.png)
Why Add to Cart uses line value (not cart total): when a shopper adds an item, we report the value of that specific item × quantity, not the whole cart. This is the ad-platform standard. Pass the full cart total on every add and multi-item sessions double- or triple-count value — your ROAS data becomes inflated.
Step 5: Save and Connect
Once the code is in:
- Click Save at the top right
- Click Connect to activate the pixel (it won't fire until you do this)
Saving alone isn't enough. The Connect button is what tells Shopify to actually run the pixel on your storefront and checkout.
Step 6: Test the full funnel
The code has debug: true in it. That tells the OpenAI SDK to log every event to your browser console — which is how you'll verify each piece is firing.
- Open your store in a new incognito window
- Right-click → Inspect → click the Console tab
- Browse to any product page. You should see contents_viewed logged with the variant price.
- Add to cart. Log: items_added with the line value.
- Click Checkout. Log: checkout_started with the cart total.
- Complete a test order (Shopify's Bogus Gateway works, or a real $1 order you refund). Log: order_created with the final total and order ID.
If all four events appear in the console with real values, your pixel is working. Give it 15–30 minutes, then check the OpenAI dashboard — your conversions should start showing up there too.
Step 7: Turn off debug mode
Once everything's confirmed, flip debug: true to debug: false. Save again. The pixel keeps tracking — you just stop logging events to every visitor's browser console.
Troubleshooting (the four things that break this install)
Nothing fires in the console at all
The code almost certainly still has <script> tags around it. Shopify Custom Pixel only accepts raw JavaScript. Open the pixel and confirm the first character is !function, not <script>. Same at the bottom — it should end with });, not </script>.
Pixel shows installed but no conversions register
Three things to check:
- Did you click Connect? Saving alone doesn't activate the pixel.
- Did you create the matching conversion events in OpenAI? Base event names must match exactly — order_created in code = order_created in OpenAI.
- Is your Pixel ID correct? A typo means everything fires into the void.
Revenue is wrong or showing $0
The pixel is reporting but the amount is broken. Open the console, find the measure log, and check what's in the amount field. If it's 0 or undefined, the Shopify event payload may have a different structure on your store (rare, but it happens with heavily customized checkouts). Adjust the variable path in the relevant analytics.subscribe block.
Events firing twice
Almost always means the pixel is installed in two places — usually Custom Pixel plus a leftover snippet in theme.liquid or Additional Scripts. Remove every other copy. Custom Pixel should be the only place this code lives.
That's it — you're tracking AI-driven conversions
As ChatGPT and other AI tools become real referral channels, the brands that set up clean attribution early are the ones that'll make confident decisions about where to invest. The rest will be guessing.
Now you're not guessing.